IV

IV

Wednesday, June 21, 2017

How to import DWG files into Fusion 360

How to import DWG files into Fusion 360

Issue:

You would like to import and open both 2D and 3D DWG format files in Fusion 360.

Causes:

Importing DWG files can cause some confusion, as the files must undergo the cloud translation process and can either contain 2D or 3D information.

Solution:

Both 2D and 3D DWG files are uploaded the Fusion 360 through the Data Panel. This pushes them through the Cloud Translation Process and will allow them to be opened and edited in Fusion 360.

To upload a DWG file (either 2D or 3D) into Fusion 360;


1. Hit the Upload button in the Fusion 360 Data Panel.
2. Browse Window's explorer for the DWG file/s that you would like upload into Fusion 360 and bring them into the Upload dialogue box. With two ways to do this one by either dragging them over or 2 hitting the "Open" button in the file explorer window.
* The files will then be shown in in the Upload dialogue box. Hit the "Upload" button to upload them to your Fusion 360 Data Panel.


3. The DWG designs are now uploaded to Fusion 360 and will be shown in your Data Panel. You can open the designs by double clicking them or right clicking them and selecting "Open."
*After uploading the DWG files, you may notice some differences in the files opened in Fusion 360. DWG files containing any 3D geometry will open as a collection of bodies and solid features - no sketches will be included in the imported 3D DWG design:
*2D DWG files, however, only include two-dimensional geometry. These files will open in Fusion 360 with no solid geometry but a collection of two dimensional sketches which can be edited in Fusion 360:

Thursday, February 23, 2017

Weekly Revit Tip - Need elements locked in Revit!?

Work-sharing : Work-set Locking


There will most likely be a time when your working on a project that not only needs work-sets setup but it also have a number of designers within that one project file. We all know, the more CAD designers within a project file the higher the chances of a project standard becoming vulnerable and certain information that you would like to prevent from being edited is exposed for change. An example for instances, the building grids have been established in a project and for no reason will the location change or for anyone  to edit them. Unfortunately, Revit does not come with "layer lock" or any sort of “lock” tool, but as long as Work-sharing is enabled work-sets can be utilize as "locks". 

To do this, from the Application menu, choose Options and then change the user name to “Admin” or something similar. Make sure the items you want to “lock” are on a workset dedicated to this purpose. In the example above, if you want to lock the building grids, you can simply check out the Shared Levels and Grids workset. Otherwise, you can create a custom workset, place elements on it and then “lock” it. To lock a workset, simply open the “Worksets” dialog, select the workset you want to lock and click the Editable button. The name Admin will appear in the Owner column (see below Figure 20).

Figure 20—To “lock” a workset, create an Admin user and leave it checked out


Click OK to dismiss the dialog and then close the project file. When you synchronize, do not relinquish User-created Worksets. This means that the user “Admin” will continue to own the workset even after quitting Revit. No one else will be able to modify the Shared Levels and Grids (or other workset locked this way) until Admin returns to the file and relinquishes.

Important: This tip goes against what is normally considered best practice when working with work-sharing Revit files. Typically,it's not good practice to have anyone close out of the project file without relinquishing. But in this case we make an exception since our goal is the locking of a particular work-sets. Make sure to use this technique with care and caution. 

Monday, November 21, 2016

Adaptive Points/Components/Families Creation

Adaptive points are points in 3D space that are created by modifying reference points. The geometry drawn by snapping to these flexible points results in an adaptive component. Adaptive components can be used in pattern panel families, adaptive component families, conceptual massing environment, and projects. were introduced in the 2011 release of Revit. They are an adaption of the pattern based curtain panel. Adaptive families, unlike a standard parametric family, which can be resized by flexing and changing values are able to adapt to different situations and scenarios in a building, controlled by the points you setup. They are often used for panels and curtain panels which are similar in appearance and function but different sizes.

*Adaptive families are able to ‘adapt’ to their surrounding by settings points as markers or connectors.( e.g. A square panel will have 4 adaptive points which you will add on each of the 4 corners of the structural framing.)

Just how complex Revit works, there are a number of different complexities to adaptive families, they can be used for simple geometry for instance piping or beams all the way up to advanced modeling techniques, such as rotating panels requiring an excellent work station to be able to handle the detail and repetition on a large scale and utilizing Dynamo plug-in.

In this post I will try and get a full understanding of what a Adaptive Point is, how Adaptive Components relate nto each other and how they act once loaded into Revit's project file then once I've broke down the understandings of its workings we jump to Dynamo!!!

Before jumping in to creating an adaptive family, it is worth taking some time out to plan how your family is going to function. With normal generic families, we lay out reference planes to constrain our geometry, with adaptive panels I like to use reference planes in a grid format and repeat the same grid in the Revit project when adding the family. *This consistency will reduce the chances of errors etc when you are loading your family.

When starting a adaptive family try and consider the following:
  • Add your ‘Point Elements’ in the same order that you want to insert your geometry into your project.
  • Don't forget to set out grids if you are working on more than one level.
  • Adaptive points have their own X and Y reference planes attached, when working with solid forms, use these planes to constrain the points to the geometry.
  • Be sure to use ‘Reference Lines’ rather than ‘Model Lines’ when referencing your point to the form.
  • Flexibility is KEY so go ahead and test your points are acting and reacting the way you expect, in the same way you’d flex a standard Revit family.

Step One: Adaptive Points/Components/Families Creation

Start a new family with an adaptive template.
  > Open > Family  > Browse/Selected the “Adaptive Generic Model Family” template on you machine. This opens a new blank template with and X and Y reference plane.
Add/Place Reference Planes and Point Elements(See Image below for reference)*Keep a consistency with the spacing between planes, this is important when bringing the family into your project.
uploaded image
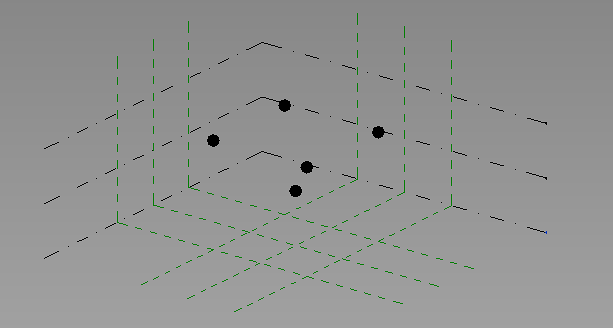
Use the view cube to lay out your points, you may notice that your points aren’t snapping to the reference planes unless you are in a ‘top’, ‘left’ or ‘right’ view. As mentioned above, make sure to enter your points in the same sequence you will add them into your project. 
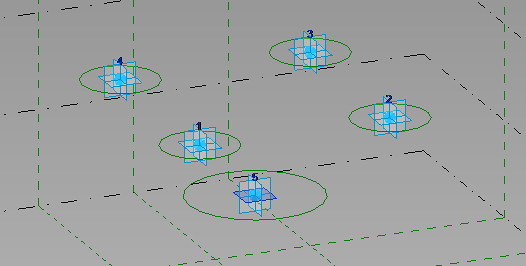
Once you are happy with the location of your points, highlight them all and click the ‘Make Adaptive’ icon on the ‘Adaptive Component’ tab. In this instance, I am going to create a random form, just to illustrate how adaptive points work.
uploaded image
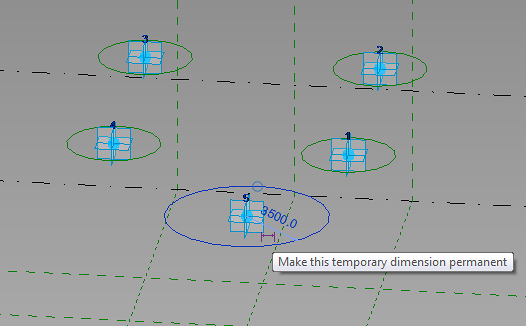
Use the ‘Set’ tool in the work plane tab, and go through each adaptive point one by one and select the horizontral face as shown on point 5 above. Once we are working on the correct plane, we can begin to create the starting point for our geometry. When creating these circles as shown above make sure to use ‘Reference Lines’ rather than model lines. Solid forms and masses can be constrained and controlled by reference lines but not model lines. We now want to add some parameters to our reference circles. To do this, simply highlight the reference circle, and click the ‘Make this temporary dimension permanent’ icon as shown below.
uploaded image
Once we have made all of our reference lines into permanent dimensions, we are able to add a parameter to control the size of the circles. Simply add a type parameter in the way you would with a normal family. Select the dimension, click on the ‘Add label’ dropdown in the actions bar and a parameter name related to the object. I will use ‘Bottom Width’ for point 5 and ‘Top Width’ for points 1-4 as they will all be the same size. You will now see these parameters appear in the ‘Family Types’ dialogue where you will be able to control the dimensions and add formulas etc. Set your reference lines to the correct sizes and we are almost ready to start adding some geometry. It is a good idea to test your new parameters and move your adaptive points around to check that everything is behaving correctly.
uploaded image
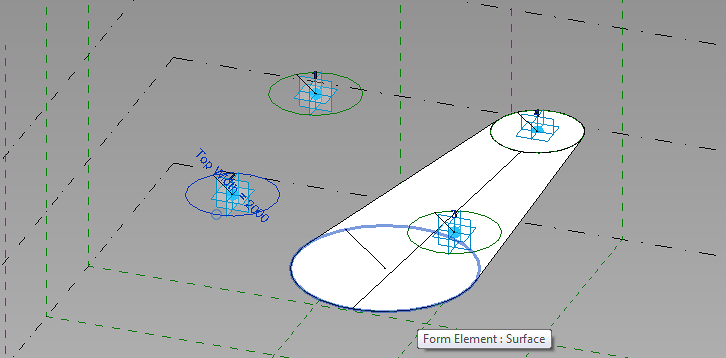
We now want to add some solid geometry to our adaptive points. There are of course a number of different ways to do this depending on the 
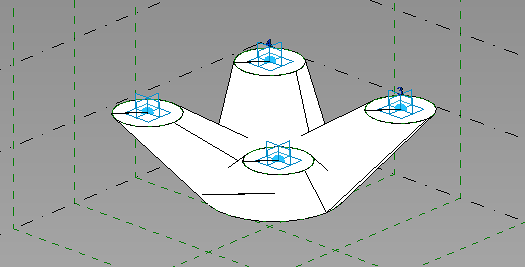
desired result. Here I will be selecting point 1-5, 2-5, 3-5, 4-5. Select reference line 1 and while holding down control, tab through your elements until you are selecting reference line with adaptive point 5 in. Select both of these and then hit ‘Create Form’ in the ‘Form’ tab on the ribbon. Repeat this step until you have 4 ‘spokes’ coming out of the wider base. If you have followed the same instructions that I have given, your adaptive family will look like the image below. 
uploaded image
Again you should now move around your adaptive points and test your parameters to check that they are performing the way they should be. Once you have completed this you are ready to save your family and add it in to a revit project. Test it out by connecting it to a Mass. It is a simple procedure and only requires you to add the points in the same way that you have added them in your family. I sometimes find it easier to recreate the grids in a mass environment in the Revit project. You can also switch nodes on to your grid lines to make the placing of points simpler.


If you have any problems or questions, leave me a comment and I’ll get back to you as soon as possible.

Friday, October 28, 2016

Parametric Modeling and Valid Formula Syntax and Abbreviations within Revit

Valid Formula Syntax and Abbreviations

Formulas support standard arithmetic operations and trigonometric functions.
Formulas support the following arithmetic operations: addition, subtraction, multiplication, division, exponentiation, logarithms, and square roots. Formulas also support the following trigonometric functions: sine, cosine, tangent, arcsine, arccosine, and arctangent.
The valid formula abbreviations for arithmetic operations and trigonometric functions are
  • Addition— +
  • Subtraction— -
  • Multiplication—*
  • Division—/
  • Exponentiation—^: x^y, x raised to the power of y
  • Logarithm—log
  • Square root—sqrt: sqrt(16)
  • Sine—sin
  • Cosine—cos
  • Tangent—tan
  • Arcsine—asin
  • Arccosine—acos
  • Arctangent—atan
  • 10 raised to an x power—exp(x)
  • Absolute Value—abs
  • Pi—pi (3.1415926...)
You can enter integers, decimals, and fractional values in formulas, using normal mathematical syntax, as shown in the examples below:
  • Length = Height + Width + sqrt(Height*Width)
  • Length = Wall 1 (11000mm)+ Wall 2 (15000mm)
  • Area = Length (500mm) * Width (300mm)
  • Area = pi() * Radius ^ 2
  • Volume = Length (500mm) * Width (300mm) * Height (800 mm)
  • Width = 100m * cos(angle)
  • x = 2*abs(a) + abs(b/2)
  • ArrayNum = Length/Spacing
You can use the round function for values in formulas. 
Function syntax Description Examples
round(x) The round function returns a value rounded to the nearest whole number. It doesn't take into consideration rounding direction.
round(3.1) = 3
round(3.5) = 4
round(-3.7) = -4
roundup(x) The roundup function returns a value to the largest integral value greater than or equal to x.
roundup(3) = 3
roundup(3.1) = 4
roundup(-3.7) = -3
rounddown(x) The rounddown function returns a value to the smallest integral value less than or equal to x.
rounddown(3) = 3
rounddown(3.7) = 3
rounddown(-3.7) = -4 
 
Parameter names in formulas are case sensitive. 

 For example, if a parameter name begins with a capital letter, such as Width, you must enter it in the formula with an initial capital letter. If you enter it in a formula using lower-case letters instead, for example, width * 2, the software will not recognize the formula. 


Note: It is recommended that you do not use a dash (-) when naming parameters. From Autodesk's Help Network Site

Thursday, October 27, 2016

Hide Unused Sections, Callouts, and Elevations

When annotating sheets I often have to deal with more than enough callouts, sections, and elevations that have not been placed on sheets. They clutter the drawing and distract me.

To clear things up, a not so intuitive filter can be made. It employs quite a bit of double negative mentality, but does the job.

First create a new filter. In Visibility Graphics, go to the Filters tab and choose Edit/New....

In the lower left corner of the dialog select the icon that looks like a sheet of paper with a tiny Sun at the upper right. Name your filter something like "Hide Unused Sections and Callouts".

Under Categories select Callouts, Elevations, and Sections. Then Filter by Sheet Number. Make the rule "does not contain" then leave the next box blank.


This filter will find every callout, elevation and section that does not have a sheet number assigned to it. The ones that have not been placed on sheets.

Back on the Filters tab add the newly created filter and uncheck the visibility box.


Now no unused callouts, elevations or sections will be visible in your view. That's better. Get back to work.

Tuesday, October 18, 2016

Space Naming Utility NO MORE...Hello Dynamo!

                     One thing that drives me crazy is when an architect or one of their designer have changed the room name or either the room number and our MEP spaces don't update with the change. Say you have over 100 rooms, that's a lot of time being used up for something that can be done in seconds. Well instead of installing another add-in to just add to the list of add-ins you might have...and if your running 2017 you will see that Dynamo's tab is now under the Manage tab and no longer listed under the Add-In's tab.(2015-2016 you will find that Dynamo is under the Add-In's Tab...)

                      Before I start I do want to say that I'm not experience coder nor a software engineer and I was able to make this post....So don't let those words like "Code writing" and "Scripting" scare you. Sometimes people can get held up over one or two words they feel as negative. One could say that Microsoft's Visual Basic and Autodesk's Dynamo has similar traits when it comes to it being both programs the process code to generated an output for whatever input was there at the time and/or vis versa...But that's it! Really thou, that's the only thing that is similar between the two programs and this is mainly due to the fact Dynamo is a visual programing program to where VBA is not. Without going too far into the whole history of computer programming, I'm going to go ahead ans just assume that you have the knowledge of the basic operations of the interface and such. If you feel the need you want to read more into Dynamo and what it is or what it could actually be used for please visit www.DynamoBIM.org .  (Download the DynamoPrimer from their website...its very handy!)

**using software: Revit 2016/Dynamo 1.1.0.2094 **

**Real Life Problem: 
Your an MEP Designer and your working on the spaces in your model but just realize that the architect just updated the rooms names/numbers. Due to the lack of options Revit does not have a clean way to pulling parameters info and/or linking info. 

In other words: My space Name/Number and Room Name/Number no longer match the architectural room names and numbers due to the linking problem that revit has with Rooms and Spaces.


**Real Life Answer:
Let's start!
                                                                                                     
Step One:
      Open your Autodesk's Revit MEP project file (ex_file: revitMEP2015_ivblog_1.rvt). Once you have you model open lets go to a 3D view and then navigate to the Manage Tab on the main Ribbon toolbar(see figure 2.1). Dynamo is an open-source platform which constantly puts new builds every other month now almost. As stated above, I'm running Revit 2016 - Dynamo 1.1.0.2094 (today's date 10/18/2016-Im currently a build behind) .
 Add-In's Tab > Dynamo 1.1.0.2094 (figure 2.1)
       Once you have Dynamo open, navigate to the Node Library on the left-hand side of the UI. The Node library;  which holds all of the "packages" and then within those packages you will find your custom and OOTB nodes that are then grouped by these 3 groups are Create, Actions and Query.)


Create, Actions and Query (figure 2.2)
 Step Two:
       Scroll down to the group Revit Node Group and select the drop-down arrow to expand the Revit Sub-groups and it contents. (see figure 2.3)
 
(figure 2.3)
The sub-group within the Revit node group has a lot of fun things to manipulate Revit's database, interface and so much more once you figure out the data flow structure and the basic understanding of the three main node categories: create, action, and query.


Step Three:
            Within the Revit Node library group, expand the Selection Node group. We need to add the following nodes to our graph with a simple double-click: Categories and All Elements of Categories. 
 
(figure 2.4)


Once Categories and All Elements of Categories are thrown on the graph re-arrange them correctly for proper data flow. Category is wired to Category on All Elements of Category(see below for correct connection.-figure 2.5) 
(figure 2.5)
Categories:
This node lets you pick a certain builtin parameter group element category belonging to Revit elements.  In this case we are selecting "Spaces" for our categories.

All Elements of Category: While the first node(Category) gets you to the category, "All Elements of Categories" will then select all the Revit objects within the chosen categories and in our case we will now generate a list of elements for the output.

                Once you collect all the spaces and a list is thrown out the output of one node's "Elements". A list with all the spaces in your selected Revit project. Now that we have all the spaces listed out in one list, we can then move to our next step. Which will be taking this new generated list and add a node to the workflow so we can extract data from those elements.

Step Four:  
             This step will start the extraction process of data that you will also manipulate within the same node just a different inlet port on the "Element.SetParameterByName" node. Adding two (2) new nodes to the graph; "Element.SetParameterByName"  and "Code Block". In quick terminology the Code Block node is a node that allows the user to input Dynamo's preferred program language; Design Script. Then The Element.SetParameterByName node has three inlet ports(Element, ParameterName & Value) and one outlet port(Element).

Element.SetParameterByName: This node has three inlets(3) - the top port takes Revit elements of any builtin category. Then the middle port is where you specify a parameter name, this parameterName would be found within that previous selected element(Case-sensitive).
Code Block: A node which has a input text box field, inside this text box will allow you to write anything under the DesignScript Handbook Dynamo's preferred language 
Element.GetParameterValueByName: Just like Element.SetParameterByName this node will querry data on the parameter of an element. With only two(2) inlet ports one to get what element is chosen and parameterName inlet port gets the Value of that parameter name you provide within this port.

See below screen shot of how these nodes with be structured...
Once you have wired up all the correct nodes in your graph and finalized your script its time to hit RUN in the bottom-left-hand corner.


Sample File.DYN Here!!


Please come back soon for i will be adding a lot more content as we move into the winter months!! So KEEP IN TOUCH!       

Thanks for the follow, please stay-in touch for their will be a lot more content being posted especially on parametric design (things like Dynamo, Revit API, Use of Parameters and so much more its exciting!!  

Cheers! 
Mickael Leedom Renaud  
duaner.ekim@gmail.com  
Downtown Los Angeles, CA 90017  
Mechanical Design Engineer
ParsonsBrinckerhoff|WSP    

Michae

Friday, October 14, 2016

First Post on my new BIM Blog - Topic | Hotkey Shortcuts for Revit

      "HelloWorld".... Well I've finally decide to create an all things BIM Blog...Now I just need to figure a way to allocate the time I already don't have just to build a creative written blog about the AEC Industry and all for people to come visit. I'm an currently a Mechanical Revit Lead / Jr. Engineer @ Parsons Brinkerhoff | WSP and going on my second year into it loving every minute because I love what I do.
      I'm originally from the Philadelphia area but since 2007 I have been a Los Angeles citizen. I mean come on to be by the beach and then with all the beautiful women that surround us here on the south-western coast of USA :)!!  Revit, Dynamo, other engineering and design software's will be discussed and anything AEC/Tech related. For my first blog entry I figured i should run through the "HotKeys" of Revit MEP or in other words...customization of "Keyboard Shortcuts".
     Some of the below shortcuts are Revits OTB and some are customized to fit my need for Mechanical, Electrical and lastly Plumbing... Email me[mrenaud8@gmail.com] if you would like the exported file for easier Importing!! Below are shortcut key commands I use daily grouped by Revit's programs interface tab's:  


[System Tab]:  
 AT (Create Air Terminal)  
DT [Create Duct]   
DA [Create Duct Accessory)  
DF [Create Duct Fitting)
ME (Create Mechanical Equipment) 
PI  (Create Pipe)  PA (Create Pipe Accessory)
PF (Create Pipe Fitting)  
CM (Place Family Component)  
SWP (Set Work Plane)
[View Tab]:   
DV (Drafting View) 
 PR (Plan Region)   
FP (Create Floor Plan)  
EL (Building Elevation)  
SC (Section)  
FI (Filters)   
Ctrl+Shift+C (Duplicate View)
LL [Thin Lines] 
3 (Create 3D View)  
VE (Managing View Templates)
VR (View Range)  
CAM (3d View: Camera)   
ZZ (ZR) (Zoom Region)  
ZA (Zoom All to Fit - all open views) 
ZF (Zoom to Fit - active view) 
ZS (Zoom Sheet Size)   
ZO (Zoom out 2x) SB (System Browser)
TL (Tile Windows)
WT (Window Tile)   
XX (Close Hidden Windows - custom) 
CW (Cascade Windows) 
[Analyze Tab]:  
S (Create Space)
ST (Create Space Tag)
SS (Create Space Separator)
Z (Create Zone) 
[Annotation Tab]:  
DI (Dimension Aligned) 
TG (Tag by Category)    
DIA (Diameter Dimension)
ML (Model Line) 
SL (Symbolic Line)
T (Text) ST (Space Tag)
SS (Space Separator)
SY (Symbol) REV (Revision Cloud)
[Manage Tab]: 
SM (midpoint)   
SE (endpoint)   
SI (intersection)   
SO (snaps off)
OS (Object Styles)  
UN (Project Units)   
PP (Project Parameters)  
SAR (Shared Parameters)  
MN (Manage Links)   
RL (Reload Latest - worksets)  
[Modify Tab]:  
MD (Modify)    
CO (Copy) 
P (Properties)   
RO (Rotate)  
SCA (Scale)  
TR (Trim - Corner)   
TS (Trim - Single Element - custom)   
TP (Type Properties) 
MI (Pick Axis Mirror)
MII  (Draw Axis Mirror)
SL (Split Element, with Delete Inner Segment option checked a lot)
AL (Align)
OF (Offset) 
RP (Reference Plane)   
MA (Match Type Properties) 
 [Add-Ins Tab]:   DY (Dynamo 1.1)
[View Control Bar]:
RE (Realistic)
WF (Wire Frame)
FN (Fine Detail)
CR (Consistent Colours)
HH (Hide Element)
HC (Hide Category)
SHH (Shaded with Edges)
HL (Hidden Line)
RY (Ray Trace)
SH (Shaded)
[Miscellaneous Elements]:  
VG (VV) (Visibility/Graphics)   
AV (Viewport: Active Viewport)  
SA (Select All Instances)  
CTRL+C (copy to clipboard)   
CTRL+V (paste)   
CTRL+X (cut to clipboard)  
HH (Temp/Hide Hide Element)   
HI (Temp/Hide Isolate Element)   
HR (Temp/Hide Reset)
IC (Temp/Hide Isolate Category)    
BRS (Browser Organization)  HK (Keyboard Shortcuts)  


[Families]:  
CAT (Family Category and Parameters)  
FT (Family Types) 


      And i could put in more for families but I don't create families like I did a few years back (back in my modeling days) but i think you guys get the picture. A few index cards now with tape placed on the sides of your monitors and BOOM...your on your way to hotkey heaven!!   


     side note: make copies of those index cards with your listed shortcuts and do what I do, study them on the subway commute home at 5pm for easier remembering which leads to faster modeling, which could lead to a better job or a cool blog like this one!!  

       Thanks for the follow, please stay-in touch for their will be a lot more content being posted especially on parametric design (things like Dynamo, Revit API, Use of Parameters and so much more its exciting!!  

Cheers! 
Mickael Leedom Renaud  
duaner.ekim@gmail.com  
Downtown Los Angeles, CA 90017  
Mechanical Design Engineer
ParsonsBrinckerhoff|WSP